

UK households spend an average of £780–£819 at Christmas, and presentation is one of the few parts of gifting a shopper fully controls. A well-tied gold ribbon bow signals more care than the gift’s price tag alone. This guide covers the exact technique for tying a symmetrical, professional gold ribbon bow, along with the materials, common mistakes, and occasion-specific adjustments that separate a neat bow from a lopsided one.
Tying a gold ribbon bow requires gold ribbon in the right width for your gift, sharp scissors, and a length of florist wire or a twist tie. Wired ribbon holds its own shape; unwired ribbon needs more careful hand tension throughout the process.
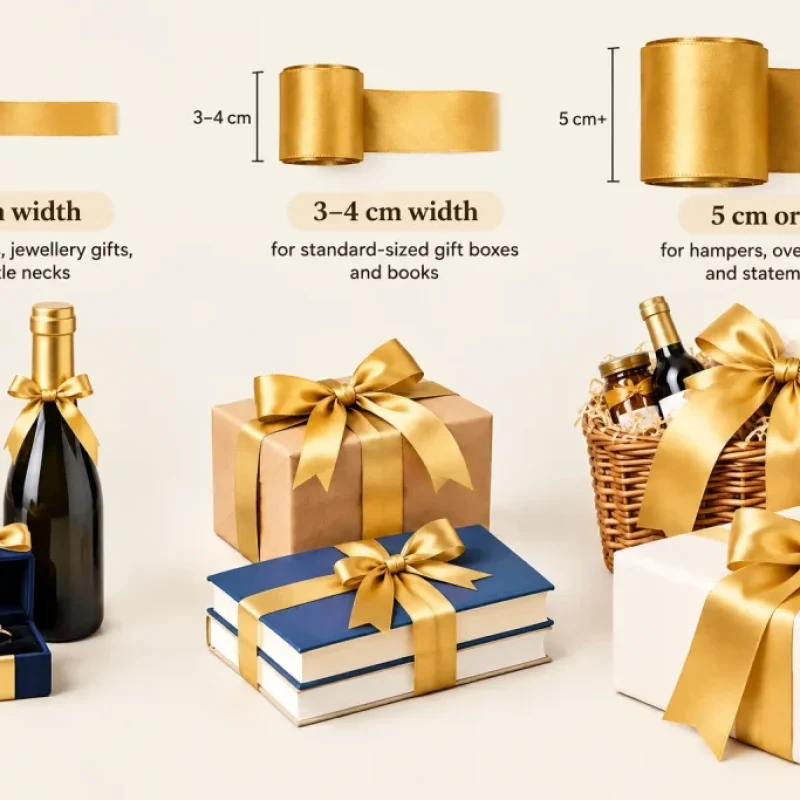
Ribbon width by gift size:

Ribbon construction:
Tools:
If your gift calls for a wider or narrower option than what’s on hand, our gold ribbon collection covers widths from 1.5cm through to 6cm in both wired and unwired finishes.
Gold ribbon is almost always metallic-coated, satin-backed, or foil-laminated, which makes it stiffer and more reflective than fabric or matte paper ribbon. This changes two things about how it handles: crease marks stay visible longer, and uneven loops catch the light unevenly, making asymmetry far more noticeable than on a plain ribbon.
Three properties explain this behaviour:
This is also why the 2026 ribbon trend toward wired-edge construction has become the default recommendation for gold specifically – a wire core lets the ribbon hold its shape without repeated hand tension, which reduces the fingerprint and crease problems described above.
Because these three properties – reflectivity, rigidity, and oil sensitivity – all affect tension and handling, the step-by-step method below controls for each one explicitly, rather than treating gold ribbon like any other bow.
Tying a gold ribbon bow follows seven steps: cut the ribbon, form a centre loop, build matching side loops, pinch the centre, secure it, trim the tails, then fluff the loops. Each step controls tension or handling specifically because of gold ribbon’s reflective, oil-sensitive surface.

Cut roughly 1.5–2 metres of ribbon for a standard four-loop bow, or more for a fuller, wider bow. Cut the ends at a straight angle first – an angled tail cut can be added later, in step 6.

Fold the ribbon into a small loop at the centre point and pinch it firmly between your thumb and forefinger. Hold the ribbon by its edges rather than its flat face, to avoid pressing fingerprints into the metallic coating.
Fold the ribbon into a loop on one side, then a matching-sized loop on the other, working outward in pairs. Keep tension even on both sides – a looser loop on one side is where most visible asymmetry starts.
Once all loops are formed, pinch the centre point tightly before securing it. This is the step that locks the loop shape in place; a loose pinch here undoes the tension control from steps 2–3.

Wrap florist wire or a twist tie around the pinched centre and twist it tightly at the back. Wired ribbon needs less force here since the ribbon itself already holds shape; unwired ribbon needs a firmer wrap to keep loops from slipping.

Cut the ribbon tails to the desired length, using an angled or notched (V-shaped) cut to prevent fraying at the edge.
Gently pull each loop outward and adjust its angle so the metallic surface catches light evenly across the whole bow. This is the step that resolves the reflectivity issue described in the previous section – uneven fluffing is what makes a technically correct bow still look flat.
If you’re working with a wider gold ribbon for a hamper or oversized parcel, our wide gold ribbon range is built specifically for the extra loop count and tail length this technique needs at scale.
Following these seven steps correctly is the difference between a passable bow and a symmetrical one – but symmetry is also the single most common point of failure, which the next section addresses directly.
Symmetry comes from pre-measuring each loop before cutting or folding it, rather than eyeballing loop size mid-tie, keeping equal tension on both sides while pinching the centre, and fluffing loops outward from the centre point rather than from the tails.
Three habits fix most symmetry problems:
This section exists separately from the step-by-step method above because symmetry is the specific problem readers return to search for after attempting the basic steps – it’s a distinct need behind the same query, not a repeat of step 3 and step 4.
Wired gold ribbon holds its loop shape without support, making it more forgiving for beginners and better suited to larger or oversized bows. Unwired gold ribbon drapes more naturally and gives a softer finish, but requires constant hand tension throughout tying, and suits smaller, neater bows better.
| Wired gold ribbon | Unwired gold ribbon | |
| Best for | Beginners, oversized bows, hampers | Smaller bows, delicate presentation |
| Loop shape | Holds shape on its own | Needs continuous hand tension |
| Finish | Structured, defined loops | Softer, more relaxed drape |
This wired-vs-unwired distinction reflects a wider shift in ribbon manufacturing: 2026 ribbon trend reporting notes that wired construction is now the standard recommendation for large, dramatic bows precisely because it holds shape “without fuss” – which is the same reason it suits gold ribbon’s stiffness described earlier in this guide.
Our wired gold ribbon and unwired satin gold ribbon are both available in the width range covered in the materials section above, so you can match construction to the bow size you’re aiming for.
Even with the right construction chosen, certain mistakes come up repeatedly regardless of wired or unwired ribbon – covered next.
The three most common gold ribbon bow mistakes are uneven loop sizes, a loose centre that lets the bow sag, and visible fingerprints on the metallic surface. Each has a specific, quick fix rather than requiring the bow to be retied from scratch.
| Mistake | Fix |
| Uneven loops | Pre-measure each loop before folding rather than adjusting after tying |
| Sagging or loose centre | Re-twist the wire tighter, or add a second wrap around the pinch point |
| Visible fingerprints or smudges | Handle the ribbon by its edges only; wipe gently with a dry, lint-free cloth |
| Wire poking through the tail | Fold the cut edge under itself before securing the centre |
These four issues map directly back to the three properties covered earlier – reflectivity causes uneven loops to show, rigidity causes wire to poke through if the edge isn’t folded, and oil sensitivity causes visible fingerprints. Fixing the symptom without addressing the underlying property (for example, wiping fingerprints without changing how you hold the ribbon) means the same mistake tends to repeat on the next bow.
With the technique and troubleshooting covered, the remaining question is which gold ribbon actually suits the occasion in front of you.
Champagne gold – a muted tone softer than bright yellow-gold – suits premium and everyday gifting. Bright metallic gold suits Christmas and celebratory wrapping. Antique or bronze-toned gold suits handmade, rustic, or artisan-style presentation.
Browse the full gold ribbon shade range to compare champagne, bright metallic, and antique gold side by side before choosing width and construction from the sections above.
Choosing the right shade also affects what happens to the ribbon after the gift is unwrapped – which is where reuse becomes worth considering.
Gold ribbon can be reused if it’s untied rather than cut off the gift, then stored flat or loosely wound to prevent new creasing. This is a practical alternative to disposal, and one that ribbon specifically allows for in a way wrapping paper doesn’t.
The scale of the problem makes this worth doing: UK households discard an estimated 108 million rolls of wrapping paper every year, and a typical household gets through four rolls per Christmas alone. Ribbon, unlike paper, doesn’t tear during unwrapping if it’s untied rather than cut – which means the same length of gold ribbon can realistically be tied again for a future gift.
Two habits make reuse practical:
This reuse habit stays specific to ribbon-handling rather than expanding into general Christmas waste reduction, which is a separate topic outside this guide’s scope.
Gold ribbon bows are most commonly used in the UK for Christmas gifts, wedding favours, premium hampers, and corporate or luxury gifting. Each occasion typically calls for a different width and shade, covered in the sections above rather than repeated here.
A gold ribbon bow is only half of the presentation — pairing it with the right paper finishes the look. See our guide to Gold Wrapping Paper: The Ultimate Guide to Luxe Gift Presentation for how to choose and wrap with gold paper to match.
For hamper-specific wrapping beyond the bow itself, see our separate guide on how to wrap a hamper – a related but distinct technique from the bow-tying method covered in this guide. If weddings are the occasion in front of you, our wedding favour ideas guide covers presentation beyond the ribbon itself, and for gifting on behalf of a business, see our corporate gifting guide.
2.5–4cm suits most gift boxes; wider ribbon (5cm+) suits hampers and oversized presentation bows.
No – a twist tie or thin string secures the centre; florist wire simply holds shape better on wider or wired ribbon.
Roughly 1.5–2 metres for a standard four-loop bow, depending on width and desired fullness.
The centre isn’t pinched tightly enough before securing, or the loops weren’t fluffed outward after tying.